A small dent fix at home is defined as using accessible tools like suction cups, glue-pull kits, or heat methods to restore shallow vehicle dents without repainting or visiting a body shop. The industry term for this process is paintless dent repair, or PDR. DIY kits cost $30–$80 and are reusable, making them a practical first step before spending $75–$150 on a professional repair. The catch is that not every dent qualifies. Paint must be intact, the dent must be shallow, and your technique must be patient and controlled.
Which dents are suitable for DIY small dent repair at home?
Not every dent on your car is a candidate for home repair. Knowing the difference between a fixable ding and a job for a professional saves you time, money, and the risk of making things worse.
Dents that work well for DIY repair:
- Size from roughly a quarter to a baseball in diameter
- Shallow profile with no sharp creases
- Paint fully intact with no chips, cracks, or flaking
- Located on flat or gently curved panels like doors, hoods, or fenders
- Common door dings from parking lots or minor bumper dents
Dents that require professional attention:
- Cracked, chipped, or peeling paint anywhere near the dent
- Sharp creases or folds in the metal
- Dents sitting directly on a body line or panel edge
- Dents on structural components or near wheel wells
- Any dent where the metal has stretched significantly
Paint must be intact for DIY paintless dent repair to work. Compromised paint requires traditional body shop work that includes sanding, filling, and repainting. That process costs significantly more and removes the factory finish entirely.
The location of the dent matters as much as its size. A quarter-sized dent on a flat door panel is a reasonable DIY project. That same dent sitting on a sharp body crease or a curved bumper edge is not. Assess both dimensions before you open a kit.
What tools do you need for home dent removal?
The right tools make the difference between a clean repair and a worsened dent. You do not need a professional setup, but you do need quality gear.
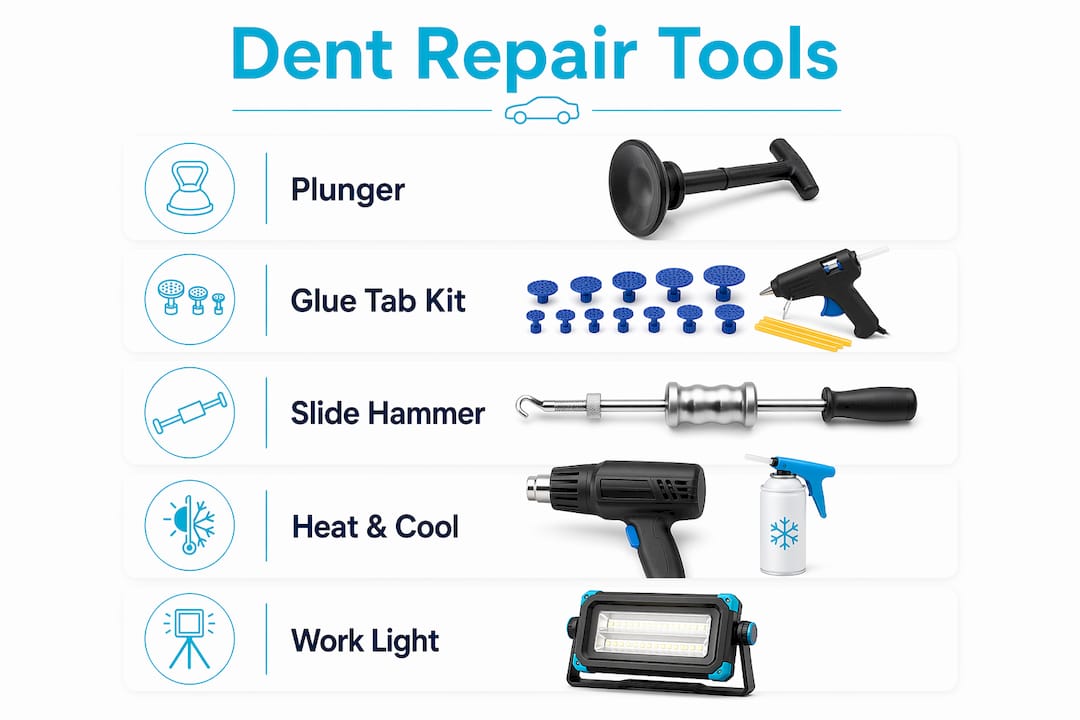
Suction cups and dedicated dent pullers
A standard household plunger works for very shallow dents on flat panels. Wet application and steady pressure are the keys to getting a plunger to pop a shallow dent. Dedicated dent puller suction cups, sold in auto parts stores, offer better grip and more controlled pulling than a household plunger. They are worth the small upgrade in cost.
Glue tab kits
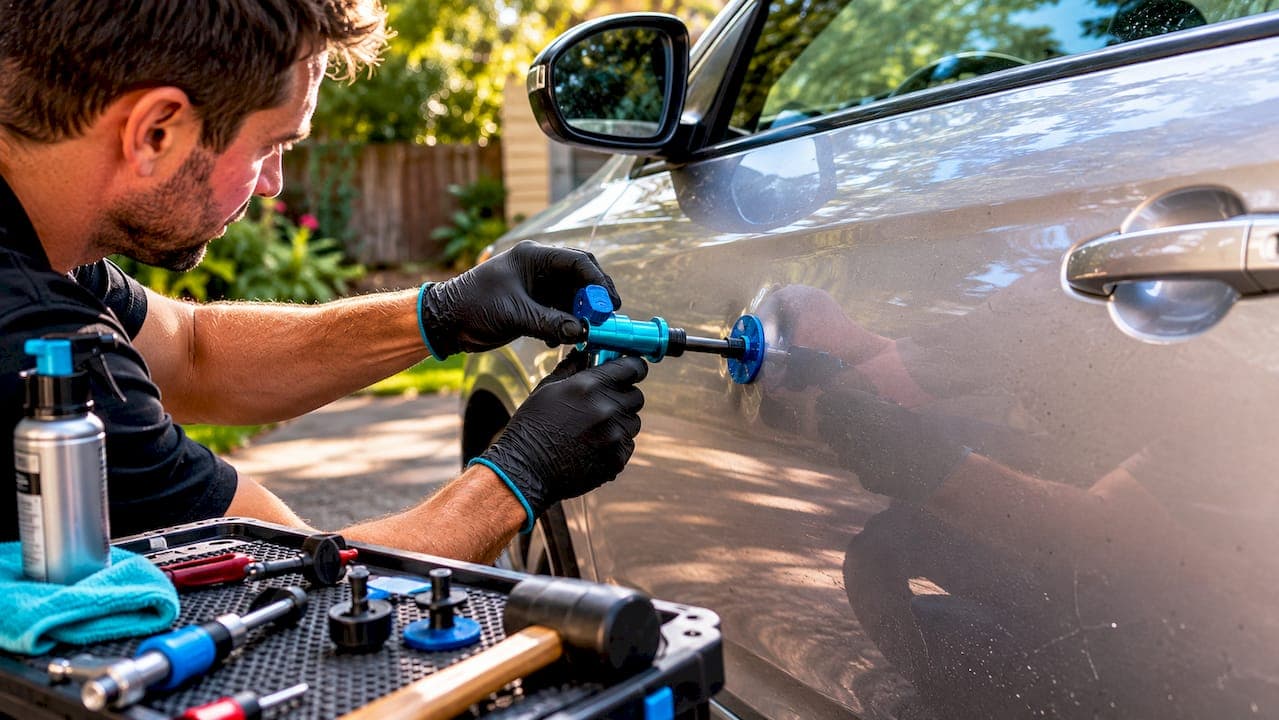
Glue tab and slide hammer kits are the most effective DIY option for dents where you cannot access the back of the panel. Glue tabs and slide hammers enable controlled, directional pulling aimed at the center of the dent. A complete kit typically includes a glue gun, several tab sizes, a slide hammer or bridge puller, and a tab remover. These kits fall in the $30–$80 range and are reusable across multiple repairs.
Supporting tools
You will also need a few items you may already own:
- A hairdryer or heat gun for warming the metal before pulling
- A can of compressed air for the heat-and-cool technique
- Isopropyl alcohol and a microfiber cloth for cleaning the surface
- Nitrile gloves to keep oils off the paint
- A bright work light or flashlight to read the dent surface accurately
| Tool | Approximate Cost | Best Use Case |
|---|---|---|
| Household plunger | $5–$10 | Very shallow dents on flat panels |
| Suction cup dent puller | $10–$25 | Shallow, round dents on doors or hoods |
| Glue tab and slide hammer kit | $30–$80 | Medium dents, no rear panel access |
| Hairdryer | $15–$30 | Warming metal or plastic before pulling |
| Compressed air can | $5–$10 | Heat-and-cool method on plastic bumpers |
Pro Tip: Buy a kit with multiple tab sizes. A single large tab on a small dent concentrates pull unevenly and can create a high spot in the center.
How to fix small dents at home: step-by-step methods
Three techniques cover the majority of small dents you will encounter. Each works best on specific dent types, so match the method to the job.
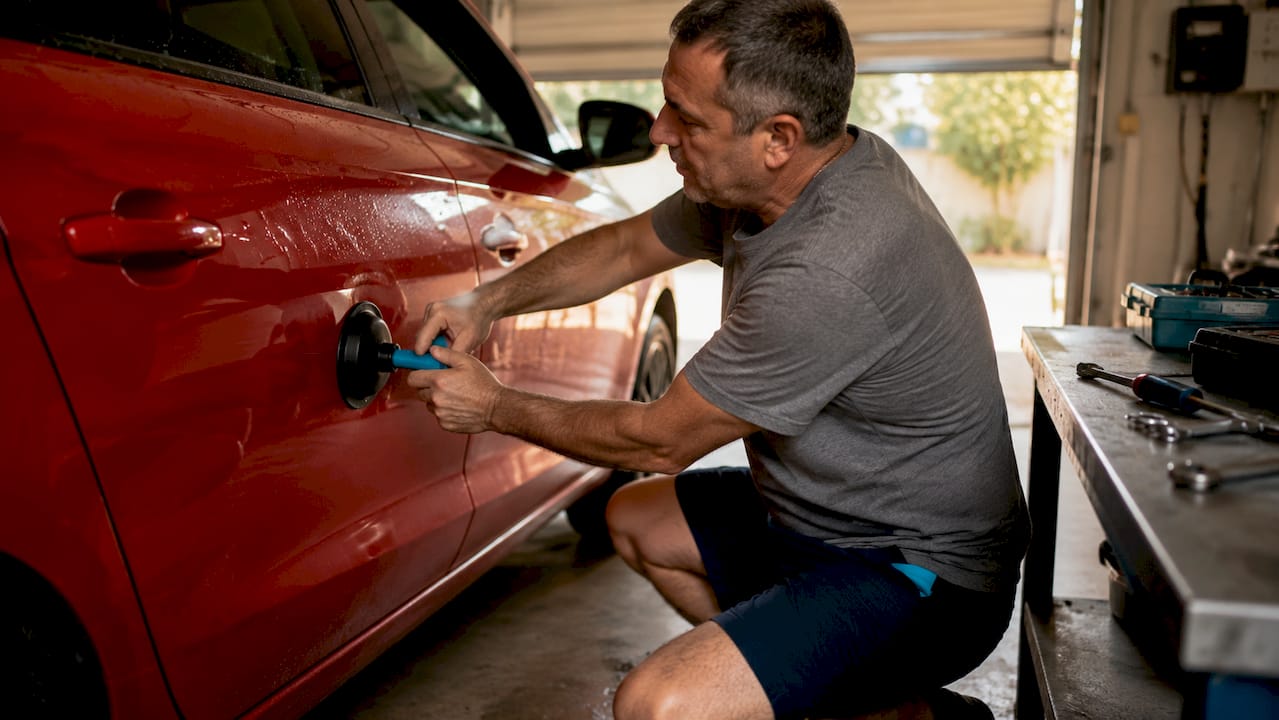
Method 1: suction cup or plunger pull
- Clean the dented area thoroughly with isopropyl alcohol and let it dry completely.
- Wet the suction cup rim with water to create a firm seal against the panel.
- Press the cup firmly onto the center of the dent and lock the grip.
- Pull slowly and steadily outward. Do not jerk or snap the cup.
- Release, inspect the dent under a work light, and repeat if needed.
- Stop if the dent is moving but a high spot appears in the center.
Suction cups are gentle and best on shallow, round dents and avoid drilling or fillers entirely. This method works best on door dings and minor hood dents where the metal is not stretched.
Method 2: glue tab and slide hammer
- Clean the surface with isopropyl alcohol and let it dry fully.
- Heat the glue tab with a glue gun and press it firmly onto the center of the dent.
- Wait 60–90 seconds for the glue to set before applying any force.
- Attach the slide hammer or bridge puller to the tab.
- Pull in short, controlled increments. Check progress after each pull.
- Remove the tab with the tab remover tool and clean off any glue residue with isopropyl alcohol.
Warning: Never heat the glue tab with a torch or open flame. Excessive heat damages paint and can warp thin metal panels.
Iterative progress and knocking down high spots is the key to avoiding the "volcano effect," where the center of the dent rises above the surrounding panel. If a high spot appears, use a rubber knockdown tool to gently tap it back down before continuing to pull the edges.
Pro Tip: Work the outer edges of the dent first, then move toward the center. This approach prevents the center from rising while the edges are still depressed.
Method 3: heat and cool for plastic bumpers
This technique is specifically for small dents in plastic bumpers, not metal panels.
- Use a hairdryer on medium heat and warm the dented area for 30–60 seconds, keeping the dryer 4–6 inches from the surface.
- Immediately spray the area with a can of compressed air held upside down.
- The rapid temperature drop causes the plastic to contract and often pops the dent back into shape.
- Repeat up to three times if the dent does not fully release on the first attempt.
Heating the dent and spraying compressed air to cool it rapidly is the most effective method for shallow plastic bumper dents. Metal panels do not respond to this technique the same way, so do not apply it to steel or aluminum body panels.
Troubleshooting: when DIY dent repair goes wrong
DIY techniques are trial-and-error approaches with varying results, and knowing when to stop is as important as knowing how to start.
Common problems and their causes:
- High spot or volcano effect: You pulled too aggressively or pulled the center before the edges. Tap down the high spot with a rubber knockdown tool and work more gradually.
- Dent barely moved: The metal may be too thick, the dent too deep, or the panel too curved for suction-based methods. Switch to a glue tab kit.
- Glue tab keeps releasing: The surface is not clean enough, or the panel temperature is too cold. Clean again with alcohol and warm the panel slightly before applying the tab.
- Paint cracked during pulling: Stop immediately. The dent now requires professional body shop repair, not PDR.
The best DIY dent repair outcomes come from slow, controlled work rather than aggressive pulls or quick fixes.
Dents with creases, sharp folds, or stretched metal do not respond to pulling alone. Creased metal has memory in two directions, and pulling from one side creates uneven stress. These repairs require professional rods and light boards to monitor progress accurately. Continuing to pull on a creased dent at home risks tearing the paint or permanently deforming the panel.
The cost-benefit calculation shifts quickly once paint is involved. A $50 DIY kit that cracks the paint turns a $100 professional PDR job into a $400 body shop repaint. Recognize that threshold and stop before you cross it.
DIY dent repair vs. professional PDR: how do they compare?
Understanding the gap between home methods and professional paintless dent repair helps you make a smarter decision about which route to take.
Professional PDR for small dents costs $75–$150 and small door dings take 30–60 minutes to repair. That price point is genuinely competitive with a quality DIY kit, especially when you factor in the risk of a failed attempt.
Professional PDR preserves factory paint and resale value better than traditional body shop repair using fillers and repainting. That matters when you sell the vehicle. A car with its original factory finish commands more on resale than one with repainted panels, which show up on paint thickness gauges used by buyers and dealers.
| Factor | DIY Repair | Professional PDR |
|---|---|---|
| Cost | $30–$80 (reusable kit) | $75–$150 per small dent |
| Time | 30 minutes to several hours | 30–60 minutes |
| Finish quality | Variable, skill-dependent | Consistent, flawless |
| Paint preservation | Risk of damage if done wrong | Factory finish maintained |
| Best for | Shallow, simple dents | Any qualifying PDR dent |
| Resale value impact | Uncertain | Positive |
Pro Tip: If your car is less than three years old or you plan to sell it within two years, professional PDR is worth the cost. The factory finish is a real asset.
Professional PDR technicians use specialized rods and light boards to monitor dent progress from behind the panel. That level of precision is not available in any home kit. For complex dents, the difference in outcome is significant.
Key takeaways
DIY dent repair works reliably only on shallow, paint-intact dents using patient, controlled technique. Professional PDR is the better choice for anything more complex.
| Point | Details |
|---|---|
| Paint integrity is non-negotiable | Any cracked or chipped paint disqualifies a dent from DIY repair immediately. |
| Match the method to the dent | Use suction cups for shallow round dents, glue tabs for deeper dents, heat-cool for plastic bumpers. |
| Work slowly to avoid high spots | Aggressive pulling creates a volcano effect that complicates further repair. |
| DIY kits cost $30–$80 | Reusable kits are cost-effective for multiple small repairs over time. |
| Professional PDR protects resale value | Factory paint preservation adds measurable value when selling your vehicle. |
What i've learned from watching DIY dent repairs go both ways
I have seen car owners pull off genuinely impressive repairs with a $40 glue tab kit and a good work light. I have also seen a $200 hood dent turn into a $600 repaint because someone got impatient and yanked too hard. The difference between those two outcomes is almost never the tool. It is the mindset going in.
Most people underestimate how much patience PDR requires, even at the amateur level. The technique is iterative by design. You pull a fraction of the dent depth, inspect under light, tap down any high spots, and repeat. That cycle might run 15 to 20 times on a single dent. Anyone expecting a one-pull fix is going to over-pull and create a new problem.
My honest recommendation is this: try the suction cup method first on any qualifying dent. It is the lowest-risk entry point. If the dent does not move after three clean attempts with good technique, move to a glue tab kit. If the glue tab kit is not producing clean results after a few careful sessions, the dent is telling you something. Listen to it.
The one situation where I would skip DIY entirely is any dent near a compromised paint surface. Paint that is already weakened by sun damage, chips, or micro-cracks will not survive the stress of pulling. You will end up at a body shop regardless, and you will pay more because of the additional damage. Knowing when to call a professional is not admitting defeat. It is protecting your investment.
— Martin
When Dent-boys is the right call
Some dents are simply beyond what a home kit can fix cleanly, and that is where Dent-boys delivers real value.
Dent-boys specializes in professional paintless dent repair that preserves your factory finish without fillers, paint, or lengthy shop visits. Every repair comes with a lifetime warranty, $0 deductible, and free pick-up and delivery so you are never without your car. Free estimates mean you know the cost before committing to anything. For dents that disqualify from DIY repair, whether from paint damage, sharp creases, or complex panel locations, Dent-boys restores your vehicle to like-new condition efficiently and affordably. Get your free estimate today and skip the guesswork.
FAQ
What size dent can i fix at home?
Dents roughly the size of a quarter to a baseball, with shallow depth and intact paint, are the best candidates for DIY repair at home. Larger or deeper dents typically require professional PDR tools and technique.
Does the heat and cool method work on metal panels?
The heat-and-cool method using a hairdryer and compressed air works specifically on plastic bumpers, not metal panels. Metal does not contract the same way plastic does under rapid temperature change.
How do i avoid creating a high spot when pulling a dent?
Pull in small increments and work from the outer edges toward the center. After each pull, inspect under a work light and tap down any rising center point with a rubber knockdown tool before continuing.
Is DIY dent repair worth it compared to professional PDR?
For shallow, simple dents on older vehicles, a $30–$80 reusable DIY kit is cost-effective. For newer cars, complex dents, or any situation involving paint risk, professional PDR at $75–$150 protects your factory finish and resale value more reliably.
Can i fix a dent if the paint is already chipped?
No. Cracked or chipped paint requires traditional body shop repair, not paintless dent repair. Attempting PDR on damaged paint risks further cracking and increases the total repair cost significantly.