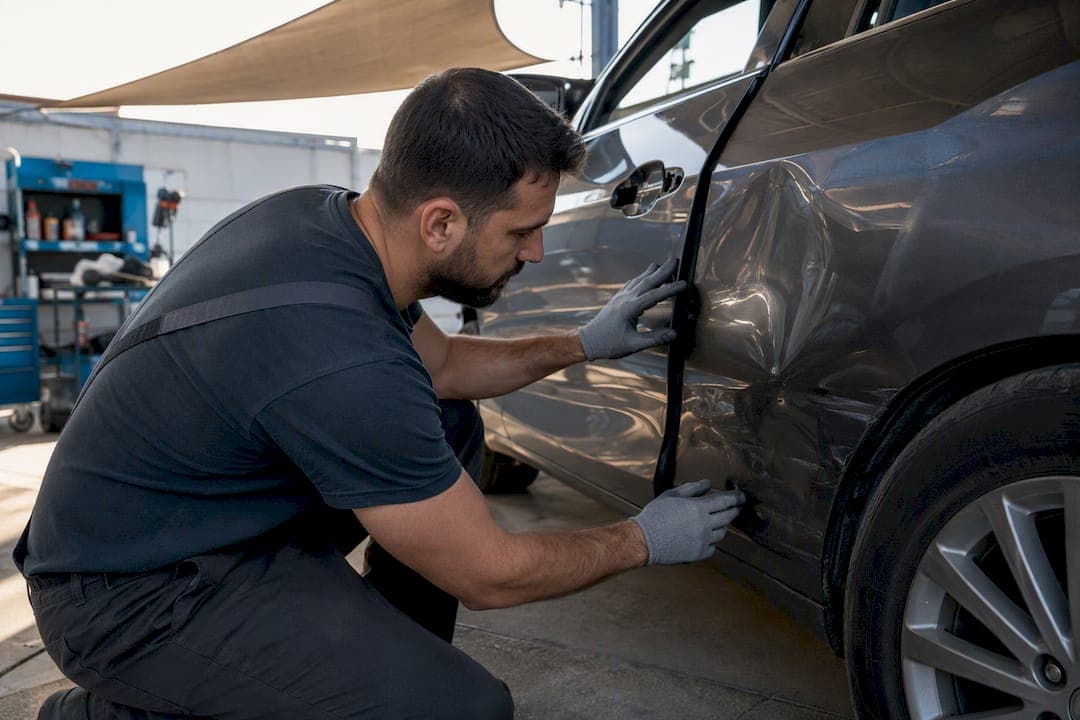
Professional assessment of multi-panel damage follows a systematic five-step process: visual and photo documentation, a pre-repair diagnostic scan, controlled disassembly to expose hidden damage, structural measurement and reshaping, and finally fitment verification, refinishing, and a post-repair scan. That order matters. Skipping disassembly and jumping straight to a repair quote is how estimates blow up midway through the job.
Before you sign anything, ask your shop for three things:
- A written repair plan with photos documenting each affected panel
- A reference to OEM repair procedures for your specific make and model
- A pre-repair diagnostic scan report showing fault codes captured before work begins
On your end, take your own photos of all the damage, keep your keys and owner's manual handy for the technician, and confirm you'll get both pre- and post-repair scan documentation. That paperwork protects you if an insurer questions the scope later.
Table of Contents
- What Multi-Panel Damage Means and Why It Raises Scope Concerns
- Why Damage Spreads Across Panels and What Hides Underneath
- The Step-by-Step Professional Assessment Workflow
- Controlled Disassembly: What Comes Off and What Techs Look For
- Structural Correction and Metal Reshaping: Methods and Tolerances
- Refinishing, Color Matching, and Final Assembly Checks
- Equipment and Diagnostics Used to Assess Multi-Panel Damage
- When Replacement Is Required: Objective Criteria and Red Flags
- Cost Drivers, Timelines, and Working With Insurance
- How Dent Boys Applies This Assessment Workflow in Practice
- What Multi-Panel Damage Assessment Really Comes Down To
- The Assumption Most Owners Get Wrong
- Get an Assessment Without the Guesswork
- Sources
What Multi-Panel Damage Means and Why It Raises Scope Concerns
Multi-panel damage means two or more adjacent exterior panels were affected by a single collision event, whether that's a shopping cart that grazed a door and quarter panel, a parking lot fender-bender that crumpled the bumper, fender, and hood together, or a hailstorm that dimpled the roof, hood, and trunk lid at once.
Modern vehicle construction makes this more consequential than it sounds. Body panels aren't isolated pieces bolted onto a frame in the way older vehicles were built. Unibody construction and shared reinforcement structures mean force from one impact point often travels into neighboring panels and the substructure beneath them.
That's why multi-panel events raise questions single-panel dents rarely do:
- Did the impact reach structural components behind the visible panels?
- Are electronic sensors near the damage still properly aligned?
- Does one panel's damage suggest hidden stress on an adjacent mounting point?
A dent that looks purely cosmetic on the surface can still sit directly above a bent bracket you can't see from outside the car.
Why Damage Spreads Across Panels and What Hides Underneath
Panels connect to each other through mounting points, reinforcement bars, and welded seams, and those connections transfer force the same way a chain transfers tension along its length. Hit one panel hard enough and the energy doesn't stop at the seam. It travels into the bracket holding the next panel, into the weld joining a reinforcement rail, or into a wiring harness routed behind the sheet metal.
Technicians commonly uncover these hidden findings once they get inside a damaged section:
- Bent mounting brackets that throw off panel alignment
- Cracked or stressed welds in load-bearing joints
- Displaced wiring harnesses or misaligned sensors
- Damage to inner substructure that never showed on the surface
Pro Tip: Treat any initial estimate as a starting point, not a final number. A shop can't quote the full job accurately until it opens up the affected area and sees what's actually going on underneath.
The Step-by-Step Professional Assessment Workflow
A thorough shop moves through five distinct stages, and each one produces documentation that either confirms the original estimate or changes it.
- Visual inspection and data capture. The technician walks the vehicle, takes high-resolution photos of every affected panel, and records the VIN to pull accurate parts data and factory specifications for that specific model.
- Pre-repair diagnostic scan. Before any panel is touched, the vehicle gets plugged into an electronic scanner, sometimes an Autel tool, to capture fault codes and sensor status the collision may have triggered. This step matters because it creates a timestamped record of what was wrong before repair work started, which protects both the shop and the owner if a dispute comes up later.
- Controlled disassembly. Trim, lights, and fasteners come off in a deliberate sequence to expose what's behind the visible panels.
- Structural measurement and reshaping. Technicians use laser measuring systems and frame racks to compare the vehicle's actual dimensions against OEM specifications, then reshape metal to bring it back within tolerance.
At this stage, the shop documents:
- Measurement readouts compared against factory tolerances
- Photos of any newly discovered damage
- Updated labor and parts estimates based on what disassembly revealed
- Fitment, refinishing, and final scan. Panels get reinstalled, checked for consistent gaps, painted or blended as needed, then the vehicle goes through a post-repair diagnostic scan to confirm every fault code from step two has cleared.
This sequence is why a same-day quote for multi-panel damage should make you cautious. A number that skips straight past disassembly is a guess, not an assessment.
Controlled Disassembly: What Comes Off and What Techs Look For
Disassembly starts with the parts that block access to mounting points: trim strips, headlights or taillights, bumper covers, moldings, and the fasteners holding them in place. None of that is cosmetic guesswork. It's the fastest route to the structural connections underneath.
Once those pieces are off, technicians inspect for specific problems:
- Bracket alignment relative to factory positioning
- Weld integrity at structural joints
- Condition of reinforcement bars behind the visible panel
- Corrosion, especially on vehicles with prior repair history or rust exposure
Anything new that shows up here gets photographed and added to a written repair plan, which is what gets submitted to an insurer for approval before work continues. This is also the point where an estimate that looked like a two-panel cosmetic job sometimes becomes a four-panel structural repair. It's not a bait-and-switch. It's the disassembly doing exactly what it's supposed to do.
Structural Correction and Metal Reshaping: Methods and Tolerances
Once hidden damage is confirmed, the correction phase depends on how far the metal deviated from its original shape. Technicians pull it back into position using a combination of stud welding, hydraulic straightening equipment, and controlled hammer-and-dolly work, welding in new material only where the original metal was torn or too compromised to reshape.
The tolerance question is where equipment does the real work. Laser measuring systems and frame racks, tools like those from Car-o-liner or Cheetah, pinpoint exact reference points on the vehicle's structure and compare them against factory measurements down to the millimeter. That comparison tells the technician whether a panel can be pulled back into spec or whether the metal has stretched beyond what a repair can safely correct.
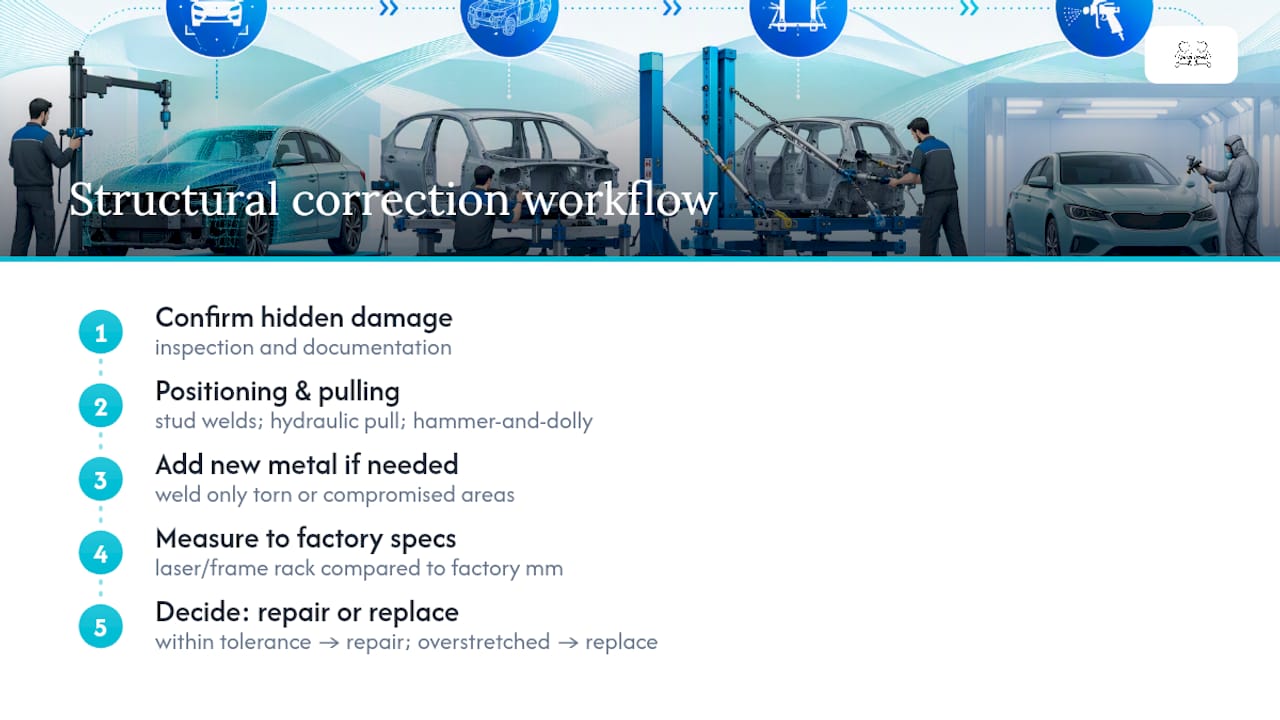
Shops generally prefer repair over replacement whenever the frame rack confirms factory tolerances can be met, since it costs less and avoids sourcing a new OEM panel. But overstretched metal is a real risk. Push steel past its yield point trying to save a panel, and you end up with a part that looks fine but has lost structural integrity it can't get back.
Pro Tip: Ask to see the measurement readout, not just hear the shop say "it's within tolerance." A printed comparison against factory specs is the difference between a documented repair and a verbal assurance.
For a deeper look at how technicians weigh reshaping against replacement, see this metal reshaping guide.
Refinishing, Color Matching, and Final Assembly Checks
Refinishing is the last stage, and it happens only after the mechanical checks confirm the vehicle is structurally sound and every panel fits correctly. Painting first and adjusting fitment second is backward, and it's expensive backward.
Color matching relies on spectrometer cameras that read the exact pigment and finish of your vehicle's paint, then blend that formula across panel edges so there's no visible seam between the repaired section and the original factory paint. Getting that blend right across multiple adjacent panels is harder than matching a single spot repair.
Before any paint goes on, technicians verify:
- Gap consistency between panels and body lines
- Hinge operation on doors, hoods, and trunks
- Sensor placement for cameras, parking sensors, and blind-spot monitors
That sequencing exists for a practical reason. Alignment problems found after paint means stripping a freshly finished panel to fix a hinge, which nobody wants to do twice. Once paint cures, technicians denib and polish the surface, then run the post-repair diagnostic scan to confirm every fault code triggered during the collision has cleared.
Equipment and Diagnostics Used to Assess Multi-Panel Damage
The equipment a shop uses tells you a lot about how seriously it treats structural accuracy. Laser measuring systems paired with frame racks, the Car-o-liner and Cheetah category of equipment, give technicians a dimensional reference point that visual inspection alone can't match. These systems compare hundreds of points on the vehicle's structure against factory data simultaneously.
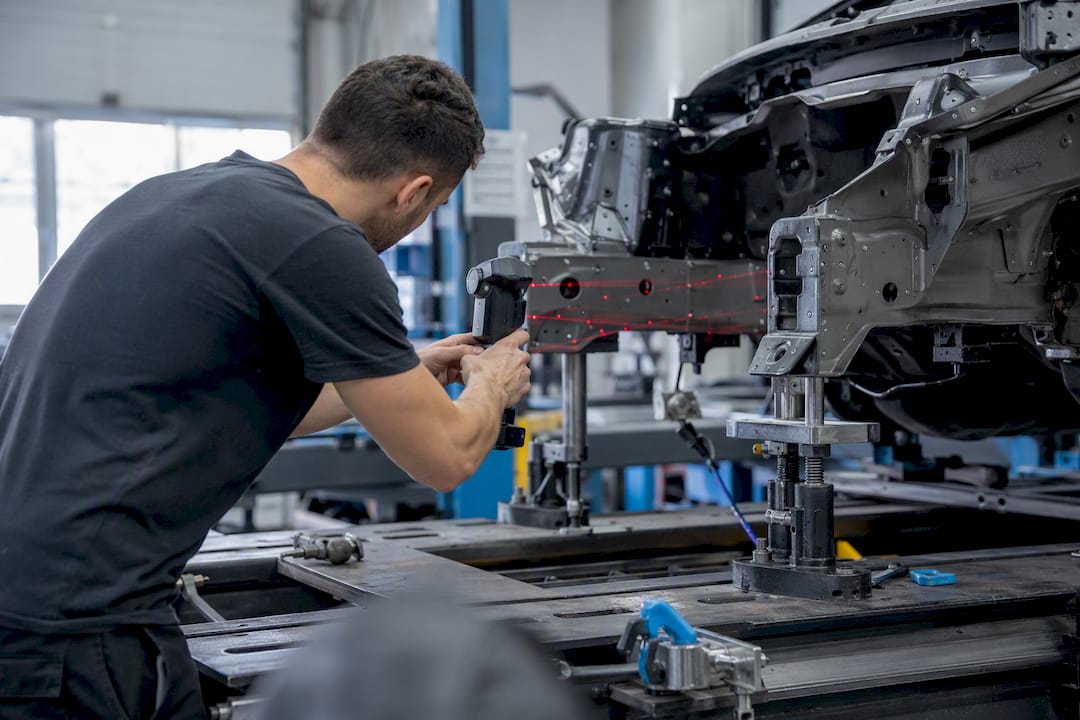
For reshaping work, hydraulic pulling systems and stud welders apply controlled, measurable force rather than the guesswork of hand tools alone. Diagnostic scanners, Autel units among them, capture the electronic side of the assessment, logging fault codes before and after repair so nothing gets missed in systems like airbags, parking sensors, or cameras.
Emerging automated tools are starting to support this process too. Frameworks like CDASS use image segmentation to estimate damage severity as a ratio of damaged area to total vehicle surface, while part-aware assessment models combine area ratios with confidence weighting to reduce errors caused by camera angle. These systems are useful for triage, but they don't replace the physical measurement a frame rack provides.
When Replacement Is Required: Objective Criteria and Red Flags
Not every damaged panel can be saved, and the decision isn't a judgment call, it's a measurement. A panel typically requires replacement rather than repair when:
- Metal is torn or stretched beyond what reshaping can recover
- Mounting points are cracked or compromised in a way welding can't reliably fix
- Welds in load-bearing structural areas have fractured
- Corrosion has weakened the panel enough that repair work won't hold
That decision should trace back to documented measurement readouts and OEM repair tolerances, not a technician's gut feeling. Automated appraisal systems, patented approaches among them, can flag likely internal damage from image data alone, but they still rely on physical inspection to confirm what's actually happening beneath the surface.
If a shop tells you a panel needs replacing, ask to see the photos, the specific OEM procedure they're citing, and the measurement numbers behind that call. For a closer look at how that repair-versus-replace line gets drawn, this decision guide walks through the criteria in more depth.
Cost Drivers, Timelines, and Working With Insurance
Multi-panel repair costs swing on a handful of factors, and hidden damage is the biggest one. Labor hours for structural correction, the need for OEM-sourced parts rather than aftermarket substitutes, paint blending across multiple panels, and recalibration of electronic safety systems all add up fast once disassembly reveals the real scope.
Here's the sequence that keeps costs predictable rather than surprising:
- Get an initial estimate, but treat it as provisional.
- Request documentation the moment disassembly reveals new damage, photos and an updated written plan.
- Confirm the updated estimate references OEM standard repairs for your vehicle before approving additional work.
- Keep copies of both the pre-repair and post-repair diagnostic scan reports for your insurer.
Pro Tip: File your insurance claim with the pre-repair scan report attached from day one. It's the single easiest way to prevent a dispute over whether a fault code existed before or after the shop touched your car.
For a breakdown of typical labor and parts costs by repair type, this bodywork cost guide covers what to budget for common scenarios.
How Dent Boys Applies This Assessment Workflow in Practice
Dent Boys built its service around removing the friction owners usually deal with during multi-panel assessments. Free estimates mean you're not paying to find out whether your damage qualifies for paintless dent repair. Pick-up and delivery, plus a rental vehicle during the repair, mean you're not stuck without transportation while panels get assessed and corrected. And $0-deductible handling combined with a lifetime warranty takes the financial guesswork out of the process entirely.
Paintless dent repair fits multi-panel events well when the damage is cosmetic, hail dimpling across a hood and roof, for instance, without paint cracking or metal stretching. Where disassembly reveals structural stress, cracked welds, or compromised mounting points, that's when a case moves beyond PDR into the structural correction workflow described above.
- Free estimates before any commitment
- Pick-up, delivery, and rental vehicle support during repair
- $0-deductible insurance handling and a lifetime warranty on completed work
What Multi-Panel Damage Assessment Really Comes Down To
Accurate multi-panel damage assessment depends on completing controlled disassembly and structural measurement before any final repair-or-replace decision gets made.
| Point | Details |
|---|---|
| Treat first estimates as provisional | Full scope often isn't visible until controlled disassembly exposes hidden bracket, weld, or substructure damage. |
| Ask for scan documentation | Request both pre-repair and post-repair diagnostic scan reports to protect against insurance disputes. |
| Verify measurements, not opinions | Ask to see laser measuring or frame rack readouts compared against OEM tolerances before accepting a replacement recommendation. |
| Sequence matters for refinishing | Alignment and fitment get verified before painting to avoid costly rework after paint has cured. |
| Dent Boys handles owner-side friction | Free estimates, pick-up/delivery, a rental vehicle, $0-deductible claims, and a lifetime warranty reduce the hassle around PDR-eligible multi-panel damage. |
The Assumption Most Owners Get Wrong
Most owners assume a repair estimate is a fixed number the moment it's written down. It isn't, and treating it that way is where most of the frustration in multi-panel claims comes from. The number on that first page is a technician's best read of visible damage, not a verdict on what's actually wrong with the car.
What gets overlooked in most advice about this process is how much power the owner actually has before disassembly starts. Asking for a written repair plan with photos, requesting the pre-repair scan report, and confirming OEM procedures are being referenced isn't paranoia. It's the same documentation an insurer will eventually ask for anyway, so getting it early just moves the friction to a point where it's cheap to resolve instead of expensive.
The conventional wisdom to "get multiple quotes" misses the real variable. Two shops can hand you wildly different numbers not because one is padding the bill, but because one opened the car up and one didn't. Prioritize the shop that documents its process, not the one that quotes fastest.
— Martin
Get an Assessment Without the Guesswork
Dent Boys handles multi-panel damage the way this article describes: visual inspection, diagnostic scanning, and honest documentation before any repair decision gets made, without the runaround of shuffling between a body shop, a rental counter, and your insurance company on your own. Free estimates mean you find out where your damage actually stands before committing to anything.
If your vehicle has hail damage or a multi-panel impact and you're not sure whether it qualifies for paintless dent repair, get a free estimate from Dent Boys and let a technician walk you through what your specific damage actually needs, backed by a $0-deductible process and a lifetime warranty on the work.
Sources
Readers interested in how automated tools are changing damage assessment can look at CDASS, a framework that scores severity as damaged area relative to total vehicle surface, and the Scientific Reports part-aware assessment study, which weights damage-to-part area ratios for more reliable scoring across camera angles.
For how image-based appraisal ties into cost estimation, the automated appraisal patent describes systems that map 2D damage images to 3D vehicle models. For OEM-aligned repair standards, i-CAR's platinum resources remain the industry reference point shops use to confirm structural tolerances.
- Part-level vehicle damage assessment via enhanced YOLO11 and area-ratio severity modeling | Scientific Reports
- Automated vehicle damage assessment and cost-estimation system (patent)